Hard drive issues can lead to data loss, system crashes, or slow performance. The good news? Most problems show warning signs before complete failure, giving you time to act. Here’s what you need to know:
- Key Warning Signs: Strange noises (e.g., clicking or grinding), frequent crashes, slow performance, or error messages during boot.
- Quick Fixes: Use tools like CHKDSK (Windows) or Disk Utility (macOS) to scan and repair errors.
- SMART Monitoring: Check your drive’s health using built-in SMART tools or third-party software like CrystalDiskInfo.
- Backup Now: If signs of failure appear, back up your data immediately to avoid expensive recovery costs.
Pro Tip: Regularly monitor your drive and follow the 3-2-1 backup rule – three copies of data, two different storage types, and one offsite.
Below, you’ll find step-by-step guidance on diagnosing hard drive issues and deciding when to replace or seek professional help.
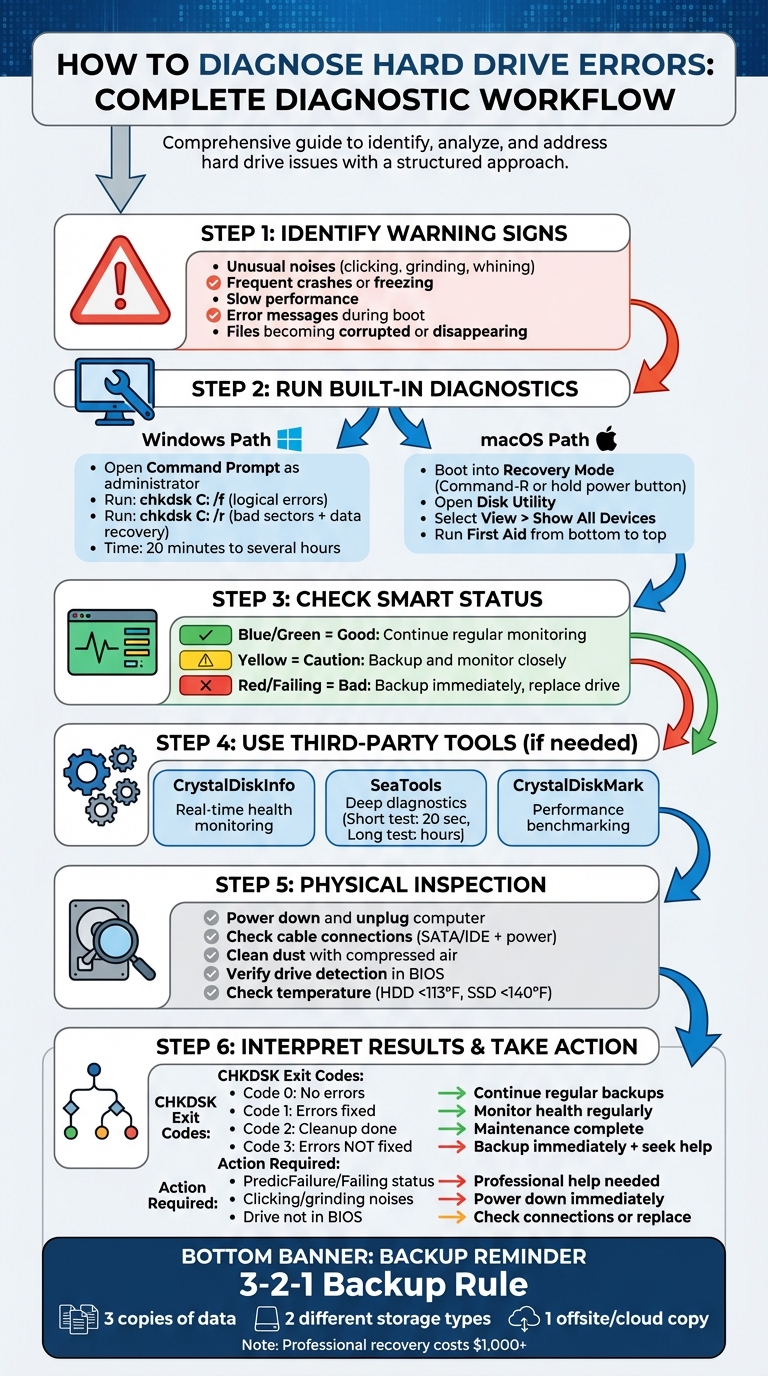
Step-by-Step Guide to Diagnosing Hard Drive Errors
Common Signs of Hard Drive Problems
Hard drives often give warning signs before they fail completely, giving you a chance to back up your data and avoid costly recovery efforts. As Whitson Gordon from PCMag explains:
"Every storage drive dies eventually, and when it’s near death, you’ll see the signs. Strange noises, corrupted files, crashing during boot, and glacial transfer speeds all point to the inevitable end."
Here are some key indicators to look out for:
Unusual Noises or Clicking Sounds
Hard drives typically produce a soft hum during operation. However, if you start hearing grinding, clicking, whining, or groaning sounds, it’s a clear red flag. Grinding noises, in particular, are alarming because they suggest that the read/write heads are scraping against the magnetic platters – this can lead to immediate data loss. Similarly, a clicking sound, often referred to as the "click of death", indicates that the drive’s internal components are struggling to read or write data. If you notice these sounds, power down your system right away to prevent further damage.
Frequent Crashes, Freezing, or Slow Performance
Performance issues like system freezes, slow file transfers, or sluggish boot times often point to bad sectors on the drive. These bad sectors can corrupt critical files, causing frequent system crashes or even the infamous Blue Screen of Death (BSOD). Over time, mechanical wear in HDDs or the gradual breakdown of storage cells in SSDs can lead to these problems, making it harder for the drive to function properly.
Error Messages During Boot or File Access
Messages such as "drive not recognized" or "corrupted file" are strong indicators of a failing drive. Files may suddenly vanish, become unreadable, or display garbled content when opened. If you run a S.M.A.R.T. diagnostic tool and see statuses like "Caution", "Warning", or "Pred Fail", it’s a sign that your drive is on borrowed time. Back up your important files immediately. Keep in mind that attempting a full drive clone could worsen the situation for a failing drive. Using built-in diagnostic tools can help confirm the extent of the issue.
sbb-itb-2e56335
Using Built-In Diagnostic Tools
When you notice potential hard drive issues, both Windows and macOS offer built-in tools to help you scan for and repair errors. Here’s how to use them effectively.
Running CHKDSK on Windows
Windows users can rely on CHKDSK (Check Disk), a built-in utility designed to detect and repair hard drive problems. To get started, you’ll need administrator rights. Open the Start menu, right-click on Command Prompt, and select "Run as administrator." Typing chkdsk alone will show your drive’s current status.
To fix logical errors, use the command:
chkdsk C: /f
(Replace "C:" with the appropriate drive letter.)
If you want to locate bad sectors and recover data, run:
chkdsk C: /r
Keep in mind, running the /r option also includes the /f function, so it handles logical errors as well. Always back up your data before running these commands, especially with /r, since it can take a while and may mark files near bad sectors as corrupted.
If the drive is currently in use, Windows will ask if you’d like to schedule the scan for the next restart. According to AVG:
"Chkdsk /r finds and attempts to repair corrupted portions of your hard drive. It automatically runs chkdsk /f as part of this process."
Depending on the size of your drive and the severity of the errors, the scan can last anywhere from 20 minutes to several hours. Interrupting the process can lead to further corruption, so let it finish uninterrupted.
For a simpler check, you can use File Explorer. Right-click your drive, select Properties > Tools > Error checking > Check, and follow the prompts. For NTFS volumes, you can also run:
chkdsk /scan
This performs an online scan without requiring a restart, so you can continue using your computer during the process.
Now, let’s look at how macOS users can address similar issues.
Using Disk Utility on macOS
Mac users have Disk Utility, a built-in tool that checks for and repairs errors related to formatting and directory structures. To scan your startup disk, you’ll need to boot into macOS Recovery mode, as Disk Utility can’t repair a volume that’s currently in use. For Intel-based Macs, restart and hold Command-R. For Apple Silicon Macs, shut down and hold the power button until the startup options window appears.
Once in Disk Utility, select View > Show All Devices to display all physical drives, containers, and volumes. Repairs should be performed in a "bottom-up" order. Start with the last volume listed in the sidebar, click First Aid, and select Run. When it’s done, move up to the next item and repeat the process until you’ve run First Aid on the top-level device.
Apple Support emphasizes:
"If Disk Utility tells you the disk is about to fail, back up your data and replace the disk – you can’t repair it."
Disk Utility can address issues like "overlapped extent allocation" errors, where multiple files occupy the same space, but it won’t fix physical hardware problems. If First Aid consistently fails, you may need to reformat the drive or seek professional help.
Once you’ve checked your disk structure, it’s a good idea to review the SMART status for signs of potential hardware failure.
Checking SMART Status
SMART (Self-Monitoring, Analysis, and Reporting Technology) is a system built into most drives to monitor their health and predict failures. It tracks metrics like temperature, power cycles, and media integrity errors, giving you early warnings about hardware reliability.
On macOS, checking SMART status is simple. Open Disk Utility, go to View > Show All Devices, select your drive, and click the Info button. If the SMART status says "Verified", your drive is healthy. If it shows "Failing", back up your data immediately and consider replacing the drive.
For more in-depth diagnostics, you can install the smartmontools package using Homebrew. Run this command in Terminal:
brew install smartmontools
Then, check your drive with:
smartctl -a disk0
(Replace "disk0" with your drive’s identifier.)
Pay attention to the SMART overall-health self-assessment. As Jamie Cuevas from OSXDaily advises:
"If that says FAILED, you will want to backup your data right away, because the disk may soon fail."
Keep in mind, standard SMART checks via Disk Utility might not work for all USB external drives, so alternative tools may be necessary for those cases.
Third-Party Diagnostic Software
Third-party diagnostic tools offer advanced features for monitoring and testing your drives, often surpassing the built-in options provided by Windows or macOS. These tools provide real-time insights, detailed testing, and performance benchmarks to help you stay ahead of potential drive issues. Let’s dive into some specific options for monitoring and diagnostics.
CrystalDiskInfo for Drive Health Monitoring
CrystalDiskInfo is a lightweight utility designed for real-time health monitoring of HDDs, SSDs, and NVMe drives. It tracks S.M.A.R.T. (Self-Monitoring, Analysis, and Reporting Technology) data and presents a clear, color-coded health status:
- Blue or green: "Good" condition
- Yellow: "Caution"
- Red: "Bad" – indicating potential failure
For SSDs, keep an eye on the "Total Host Writes" and "Media Wearout" metrics, as these track the drive’s limited write cycles. CrystalDiskInfo can also alert you via sound or email if a drive’s status changes, giving you time to act before data loss occurs. Additionally, it’s important to manage drive temperatures – HDDs should stay below 113°F, while SSDs should not exceed 140°F to avoid thermal damage.
SeaTools for Advanced Diagnostics
SeaTools, developed by Seagate but compatible with most drive brands, is a powerful tool for diagnosing deeper physical issues. After launching SeaTools, it will automatically detect connected drives. Start with the "Short Drive Self Test" to quickly check basic functionality – it only takes about 20 seconds. If the issue persists, the "Long Generic" test scans the entire drive surface for bad sectors. Be aware that this test can take several hours, depending on the drive’s size.
SeaTools also includes a "Fix All" feature, which can repair minor errors automatically, making it a valuable tool for addressing certain drive issues without additional intervention.
CrystalDiskMark for Performance Testing

If you want to measure your drive’s performance, CrystalDiskMark is the go-to tool. It benchmarks sequential and random read/write speeds, helping you verify whether your drive is performing as expected. Simply select the target drive, configure the number of test runs, and start the benchmark. The results will reveal if the drive’s performance has degraded, which could signal issues like fragmentation or impending failure.
For SSDs, pay close attention to the "RND4K" (random 4K) results, as they directly impact how quickly your operating system and applications respond. This tool is particularly useful after installing a new SSD or NVMe drive to confirm that you’re achieving the speeds advertised by the manufacturer.
| Tool | Best For |
|---|---|
| CrystalDiskInfo | Real-time health monitoring and temperature alerts |
| SeaTools | Deep diagnostics and minor error repairs |
| CrystalDiskMark | Benchmarking read/write speeds and performance |
Physical Checks and Basic Troubleshooting
Sometimes, the simplest checks can save you from diving into complex diagnostics. Loose cables, dusty ports, or even incorrect BIOS settings can mimic serious hard drive issues. As iFixit puts it:
"Problems that occur when you have just installed a hard drive are almost always a simple matter of a bad or incorrectly connected cable, incorrect jumper settings, or some similar trivial problem."
Even with older systems, these straightforward problems are surprisingly common.
Inspecting Cable Connections and Ports
Before anything else, make sure to power down and unplug your computer before opening the case. Carefully inspect the data cable (SATA or IDE) and the power cable to ensure they’re securely connected. Both should click firmly into place without any wiggle. If your hard drive isn’t being recognized, try swapping out the data cable or testing a different SATA port or power connector to rule out a faulty cable or port.
While you have the case open, grab a can of compressed air and clean out any dust around the drive and its ports. Be sure to hold any fans still while cleaning to avoid damaging the bearings. Once you’ve double-checked the physical connections, restart your system and see if the drive is recognized in the BIOS.
Checking BIOS for Drive Detection
If everything looks fine physically but the drive still isn’t detected, restart your computer and enter the BIOS setup. You can usually do this by pressing a key like F2, Delete, or F12 during startup (the correct key is briefly displayed on screen). Once in the BIOS, head to the storage or boot configuration section and check if your hard drive is listed under detected devices. If it’s missing, the drive could be faulty, or the SATA port it’s connected to might be disabled.
Make sure the SATA interface is enabled in the BIOS settings. For systems that suddenly start having issues after running fine for a while, check the drive’s temperature. It should feel warm to the touch but not overly hot. Overheating can lead to intermittent errors that might disappear once the system cools down.
Understanding Diagnostic Results and Next Steps
Deciphering diagnostic results is critical for pinpointing issues with your drive. Many problems can be resolved with minimal effort, but some require more attention.
Identifying Fixable Errors
CHKDSK exit codes are your guide to understanding what happened during a scan. Here’s a quick breakdown:
- Exit code 0: No errors found – your drive is clean and functioning properly.
- Exit code 1: Errors were detected and successfully fixed.
- Exit code 2: Routine cleanup, like garbage collection, was performed (common for SSDs).
- Exit code 3: A more serious issue – errors couldn’t be fixed, or the check couldn’t be completed. This signals the need for immediate action.
Another tool, SMART status, provides a deeper look at your drive’s health. If the status reads "OK" or "Verified", your drive is in good condition, and you can continue with regular maintenance and backups.
However, if CHKDSK reports a small number of bad sectors, the utility might have recovered your data and marked those sectors as unusable. While this is a temporary fix, an increasing number of bad sectors during subsequent scans indicates physical drive failure. In such cases, replacement is your safest option.
To review detailed CHKDSK results, open Windows Event Viewer, filter by the "Application" log, and look for entries under "Chkdsk" or "Wininit".
If these standard diagnostics and fixes don’t resolve the issue or the codes indicate severe problems, it’s time to consider professional help.
When to Seek Professional Help
If diagnostic tools report "PredicFailure" (on Windows) or "Failing" (on macOS), your drive is on the brink of hardware failure. Stop using it for anything beyond essential tasks, and immediately back up critical data before it becomes inaccessible. Professional recovery services can be expensive – upwards of $1,000 – so regular backups are the best way to avoid this scenario.
Additionally, if you hear unusual noises like clicking, grinding, or loud humming, power the drive down immediately. Other red flags include the drive not being recognized in the BIOS, persistent data corruption, or files that vanish despite software attempts to recover them. In these cases, consulting experts is your best bet. For example, Gadget Medics offers professional repair services for laptops and desktops, complete with a warranty · Lifetime with Broken Club on repairs.
Before reaching out to a technician, document everything – error messages, SMART status results, and any unusual sounds. This information will speed up the diagnostic process and help technicians identify the problem efficiently.
| CHKDSK Exit Code | Meaning | Recommended Action |
|---|---|---|
| 0 | No errors found | No action needed; continue regular backups |
| 1 | Errors found and fixed | Drive is likely stable; monitor health regularly |
| 2 | Cleanup performed | General maintenance completed |
| 3 | Errors could not be fixed | Back up data immediately; seek professional help or replace the drive |
Conclusion
The health of your drive directly impacts your system’s performance and the safety of your data. Running regular diagnostics with tools like CHKDSK or Disk Utility, along with monitoring S.M.A.R.T. status, can help you catch and address issues early. As Whitson Gordon from PCMag wisely notes:
"It’s not a matter of ‘if’ your drive will fail, it’s a matter of ‘when.’ All storage drives fail eventually".
By performing quick, routine scans, you can spot problems before they escalate into costly data recovery scenarios. If diagnostics show "Caution" or "Warning", take it as your cue to start planning for a replacement – well before a complete failure occurs. Pair these checks with proactive backups to safeguard your data.
Speaking of backups, they’re your best defense against data loss. Stick to the 3-2-1 strategy: maintain three copies of your data, store them on two different types of media, and keep one copy offsite or in the cloud. Automating backups with cloud services or built-in tools ensures you’re always prepared for unexpected hardware failures.
While backups secure your data, regular monitoring keeps your drive running smoothly. Check S.M.A.R.T. status monthly, run diagnostic scans every quarter, and consistently update your backups. If you encounter persistent issues or "Pred Fail" warnings, consider reaching out to Gadget Medics, which offers professional repair services with a warranty · Lifetime with Broken Club.
Routine maintenance is your best ally. By staying vigilant with monitoring and maintaining backups, you can prevent emergencies and keep your data safe.
FAQs
What are the signs that my hard drive might be failing?
If your hard drive is on its way out, it often gives you some clear warning signs. You might hear strange clicking or whirring noises, experience frequent system crashes or freezes, or notice files becoming corrupted or disappearing altogether. Another clue? File transfers taking much longer than usual. Sometimes, you’ll even see error messages or a SMART report flagging bad sectors or other issues.
The moment you spot any of these red flags, make backing up your data your top priority. After that, run a diagnostic check using tools like CHKDSK or trusted third-party software to assess the problem. If you’re unsure about tackling it yourself, experts like Gadget Medics can help. They specialize in diagnosing and repairing electronics, giving you peace of mind that your device is in capable hands.
What should I do if my hard drive starts making unusual noises?
Strange noises like grinding or clicking coming from your hard drive are often a sign of mechanical issues. If you hear these sounds, it’s crucial to act quickly to protect your data and avoid making the problem worse. Here’s what you should do:
- Shut down your computer immediately and unplug it to prevent the drive from spinning further. This helps avoid additional damage.
- Do not use any diagnostic or repair tools. While it might be tempting, running these tools can actually make the situation worse.
- Store the drive in a safe, static-free location to prevent accidental harm.
- Reach out to a professional data recovery service without delay. For those in Boca Raton, Gadget Medics specializes in expert repair and recovery, offering dependable service with a customer-focused approach.
By taking these steps promptly, you’ll improve your chances of recovering your data while keeping the damage to your hard drive to a minimum.
How often should I check my hard drive to avoid data loss?
It’s smart to keep an eye on your hard drive’s health every few months – or at least twice a year. This habit can catch potential problems early, helping you avoid unexpected failures and the headache of losing important files.
Most operating systems come with built-in tools to check your drive’s condition. For example, Windows has CHKDSK, while macOS offers Disk Utility. If you need a deeper analysis, third-party software can provide more detailed diagnostics. And if you’re dealing with persistent issues or just unsure where to start, professionals like Gadget Medics can step in to diagnose and repair your device.