When your SSD isn’t working correctly, it can cause slow performance, boot errors, or even data loss. Most issues fall into two categories: physical problems (like loose cables or damaged ports) or logical issues (such as incorrect BIOS settings or corrupted firmware). Here’s a quick breakdown of what to check and how to fix it:
- Check physical connections: Ensure cables are secure and undamaged. For M.2 drives, confirm they’re properly seated and screwed in place.
- Inspect BIOS settings: Verify the SSD is detected and ensure the correct modes (e.g., AHCI for SATA or NVMe) are enabled.
- Format and initialize the drive: New SSDs may need to be initialized or formatted in Disk Management (Windows) or Disk Utility (macOS).
- Test externally: Use a USB enclosure to check the SSD on another system.
- Update firmware: Outdated firmware can prevent your SSD from functioning properly.
If your SSD still doesn’t work, it might have hardware damage, such as a failed controller or worn-out NAND cells. In those cases, professional repair or data recovery services may be necessary. Always back up your data at the first sign of trouble to avoid permanent loss.
SSD Connection Basics
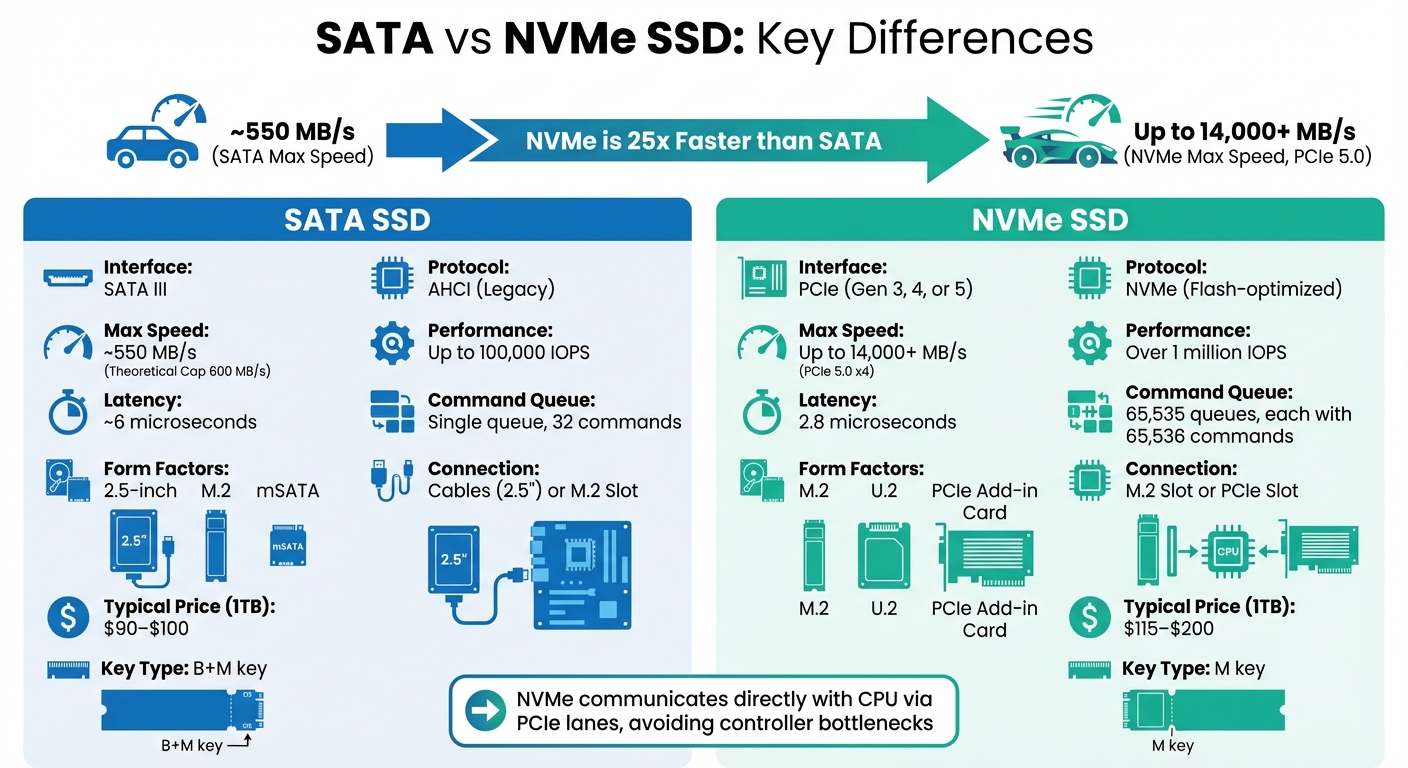
SATA vs NVMe SSD Comparison: Speed, Interface, and Performance Differences
To get the most out of your SSD, it’s important to understand the type of drive you’re using – SATA or NVMe – and how it connects to your system. Each has unique requirements and capabilities, which can significantly impact performance.
SATA vs. NVMe SSDs
SATA SSDs rely on the Serial ATA interface and the AHCI protocol. They’re typically limited to speeds of around 550 MB/s, with a maximum theoretical cap of 600 MB/s. These drives use a SATA controller, which can add latency. With performance reaching up to 100,000 IOPS and a single command queue that handles up to 32 commands, SATA SSDs are reliable but slower compared to NVMe.
On the other hand, NVMe SSDs use the PCIe bus and a protocol designed specifically for flash storage. By communicating directly with the CPU via PCIe lanes, they avoid the bottlenecks of traditional controllers. For instance, PCIe 5.0 x4 NVMe drives can hit speeds of up to 14,000 MB/s – nearly 25 times faster than SATA. High-end NVMe drives also deliver over 1 million IOPS and reduce latency to as low as 2.8 microseconds, compared to about 6 microseconds for SATA. NVMe supports up to 65,535 queues, each capable of holding 65,536 commands.
The connection method also differs. SATA SSDs in the 2.5-inch form factor require both a data cable (to the motherboard) and a power cable (from the PSU). M.2 SATA SSDs, however, plug directly into a compatible motherboard slot . NVMe SSDs, most commonly in the M.2 form factor, skip cables entirely and draw power directly from the motherboard. They need an M.2 slot with PCIe support (often called Socket 3).
Before buying, check the drive’s keying. NVMe M.2 drives typically have an "M" key (a single notch), while SATA M.2 drives often use a "B+M" key. Always consult your motherboard manual to confirm whether the M.2 slot supports PCIe (NVMe), SATA, or both. Using an NVMe drive in a SATA-only M.2 slot won’t work and is a common issue. Additionally, note that on many motherboards, only the M.2 slot closest to the CPU supports the latest PCIe generation (e.g., PCIe 5.0).
| Feature | SATA SSD | NVMe SSD |
|---|---|---|
| Interface | SATA III | PCIe (Gen 3, 4, or 5) |
| Protocol | AHCI (Legacy) | NVMe (Flash-optimized) |
| Max Speed | ~550 MB/s | Up to 14,000+ MB/s (Gen 5) |
| Form Factors | 2.5-inch, M.2, mSATA | M.2, U.2, PCIe Add-in Card |
| Connection | Cables (2.5") or M.2 Slot | M.2 Slot or PCIe Slot |
| Typical Price (1TB) | $90–$100 | $115–$200 |
Components Required for SSD Setup
Once you know your drive type, gather the necessary components for installation.
For SATA SSDs, you’ll need:
- A SATA data cable to connect the drive to the motherboard.
- A SATA power cable from the power supply.
- A mounting solution, such as a 2.5-inch drive bay or an adapter bracket for fitting 2.5-inch drives into 3.5-inch bays.
Make sure to connect the drive to a SATA III (6 Gb/s) port rather than an older SATA II port to avoid limiting performance.
For NVMe/M.2 SSDs, installation is simpler:
- Insert the drive directly into a compatible M.2 slot on the motherboard.
- Secure it with a mounting screw and standoff.
When handling an NVMe SSD, use a precision screwdriver and ensure you’re grounded to prevent static discharge. After unplugging your PC, press the power button a few times to release any residual electricity . Also, check your motherboard manual – some M.2 slots share bandwidth with SATA ports, so installing an M.2 drive might disable specific SATA ports.
Keep in mind that new SSDs often won’t appear in Windows until they’re initialized and formatted as a new simple volume in Disk Management.
How to Identify Connection Problems
After installation, it’s essential to verify that the SSD is functioning correctly. Connection issues typically present clear symptoms. Start by checking the BIOS/UEFI – access it via Del, F2, or F12 during startup to see if the drive is listed. If the drive doesn’t appear, it could indicate a loose connection, a dead port, or a failed controller.
For troubleshooting:
- Ensure all cables are securely connected, and the drive is properly seated.
- Power off the PC, remove the drive, and reinsert it to ensure a clean connection.
- If a SATA drive isn’t detected, try a different SATA port or swap in a known-good SATA cable.
Operating system tools like Windows Disk Management or macOS Disk Utility can help identify drives labeled as "Not Initialized", "Unallocated", or without a drive letter. If the BIOS detects the SSD but Windows doesn’t, initialize the drive in Disk Management using GPT (GUID Partition Table) for modern systems. Be cautious – initializing or formatting a drive will erase its contents.
"An NVMe SSD won’t work in SATA mode, and vice-versa. Check your motherboard manual." – Zeydulla Khudaverdiyev, PITS Data Recovery
If problems persist, test the SSD externally using a USB enclosure or docking station to determine if the issue lies with the drive or the motherboard. Note that high-performance external SSDs may require more power than a standard USB port can provide. Additionally, enabling or disabling the Compatibility Support Module (CSM) in the BIOS can impact the detection of newer NVMe drives on older systems.
sbb-itb-2e56335
Physical Hardware Inspection
After completing BIOS and OS checks, the next step is to assess the physical hardware. Many connection problems stem from damaged cables, loose ports, or power issues – problems you can often address yourself.
Inspecting Cables and Ports
Start by examining the cables for any visible damage. Look for frayed edges, cuts, or burn marks on the insulation. Even minor signs of melting or excessive bending can harm the internal wiring, leading to unstable connections. For SATA SSDs, remember that two cables are involved: a thin data cable and a wider power cable. Damage to either can cause the drive to malfunction.
Next, inspect connectors and pins. Bent or broken pins, corroded contact points, or connectors that feel loose can all disrupt the connection. Over time, motherboard ports may also degrade, accumulating dirt or developing bent pins that prevent proper electrical contact.
"Over 60% of intermittent USB storage failures we diagnose are due to poor cabling or inadequate power supply." – David Lin, Senior Hardware Engineer at StorageTech Labs
To rule out cable issues, swap in a known-good cable and test again. If you’re working with a SATA drive, try connecting the data cable to another motherboard port, as individual ports can fail while others remain functional. For external SSDs, use high-quality, short cables (under 3.3 ft) rated for at least 10 Gbps to minimize signal degradation.
| Physical Sign | Potential Impact on SSD | Recommended Action |
|---|---|---|
| Frayed or cut cable | Intermittent detection, data corruption | Replace the cable |
| Bent/broken pins | Complete failure to detect drive | Replace the cable or use a different port |
| Corroded contacts | Slow transfer speeds, "invisible" drive | Clean with air/soft brush or replace |
| Loose port | Random disconnections during use | Switch ports or use a powered hub |
| Burn/melt marks | Permanent hardware failure, fire risk | Stop using immediately; check power supply |
Once cables and ports are verified, move on to checking power delivery and mounting.
Verifying Power and Mounting
Before handling internal hardware, turn off and unplug your computer. If it’s a laptop, remove the battery first.
For SATA SSDs, ensure both the data cable (connected to the motherboard) and the power cable (connected to the PSU) are securely attached. Disconnect and reconnect each cable to confirm a solid connection.
"A loose cable is a common reason an SSD is not detected." – Zeydulla Khudaverdiyev, PITS Data Recovery
For M.2 NVMe drives, remove the drive from its slot, reseat it firmly, and secure it with the mounting screw. Make sure the drive sits flush against the standoff; any gap indicates improper seating.
If you’re using an external SSD, connect it to a rear USB port on the motherboard. Rear ports typically provide more stable power than front-panel ports or unpowered hubs. You can also try a "hard reset" by disconnecting all power sources and holding the power button for 15–20 seconds to drain residual electricity before reconnecting.
Testing with External Adapters
If no physical faults are found, try isolating the problem by testing the drive externally. Using a USB enclosure or docking station, connect the drive to a different computer. If the drive works externally, the issue likely lies with the original computer’s cables, ports, or motherboard.
For 2.5-inch SATA SSDs, a SATA-to-USB adapter cable provides a quick and portable testing option. For M.2 NVMe drives, you’ll need an NVMe enclosure. Ensure it supports high-speed cables rated for 10 Gbps or higher. Keep in mind that high-performance SSDs may require more power than a standard USB port can supply; using a powered USB hub can help, particularly during heavy write operations.
"The enclosure’s bridge board (converts internal interface to USB) can fail independently. Testing SSD outside enclosure… isolates the issue." – Zeydulla Khudaverdiyev
If the drive still doesn’t work in an external enclosure on another computer, the problem is almost certainly with the SSD itself. This step helps confirm whether the issue lies within the drive or the computer’s hardware.
BIOS and Firmware Fixes
If your SSD isn’t showing up despite solid physical connections, the problem might stem from how your motherboard communicates with the drive. Incorrect BIOS settings or outdated firmware are common culprits.
How to Access BIOS/UEFI
After confirming your physical connections are secure, the next step is ensuring your motherboard recognizes the SSD. Restart your computer and repeatedly press the setup key as soon as the manufacturer’s logo appears. The key varies by brand – for example, Del or F2 for ASUS and MSI, F10 or Esc for HP, and F2 or F12 for Dell. If you miss the timing, restart and try again.
Once inside the BIOS/UEFI interface, navigate to menus like "Storage Configuration", "SATA Configuration", "NVMe Configuration", or "Boot." Look for your SSD’s model number and manufacturer. If it’s not listed, you might be dealing with a physical connection issue or a failed controller. However, if the SSD appears in BIOS but not in your operating system, the problem likely lies in software settings.
Adjusting SATA Controller Settings
Modern SSDs typically require the AHCI (Advanced Host Controller Interface) mode for proper functionality. Older configurations like IDE or Legacy modes can cause recognition issues. Enter the SATA configuration menu to confirm AHCI is selected. Also, make sure the SATA port your SSD is connected to is set to "Enabled" or "Auto-Detect."
For M.2 SSDs, some motherboards need manual setup. You might need to toggle between "PCIe/NVMe" and "SATA" modes depending on the drive type. Additionally, check that the PCIe bandwidth is configured as "X4" (Full) instead of "X2" (Half) for optimal performance.
Another key setting is the Compatibility Support Module (CSM). For newer NVMe SSDs using UEFI/GPT boot, CSM should be disabled. For older SATA SSDs using Legacy/MBR boot, CSM may need to be enabled. To reset everything to default, load "Optimized Defaults" from the Exit or Save menu. For a deeper reset, power off your PC and remove the silver CR2032 battery from the motherboard for 5–10 minutes, or use the CLR_CMOS jumper pins. Once you’ve adjusted the settings, revisit the BIOS to confirm that your SSD is now visible.
Installing SSD Firmware Updates
Sometimes, outdated or corrupted firmware can block your SSD from properly communicating with the motherboard. For example, in November 2025, Dell reported that Micron 2200S PCIe NVMe SSDs experienced "No Drive Detected" errors and random Blue Screens – issues resolved through a firmware update.
To check your current firmware version in Windows, open PowerShell and run this command:
Get-WmiObject -Class Win32_DiskDrive | Select-Object Model, FirmwareRevision Compare the displayed firmware version to the latest one available on your SSD manufacturer’s website. If an update is available, download and use the manufacturer’s official utility – such as Samsung Magician, Crucial Storage Executive, or Intel SSD Firmware Update Tool – to apply it.
Before starting, back up your data and ensure your system is connected to a stable power source (use AC power for laptops). Losing power during an update can permanently damage the drive. Disable any drive security features in BIOS, like Drive Password Protection, that might block firmware updates. If you’re using Intel Optane memory acceleration, turn it off before proceeding. Finally, avoid updating firmware on an unstable or failing drive unless you’ve backed up your data, as a failed update could render the drive unusable.
Operating System Configuration
Once the BIOS confirms your SSD is detected and hardware connections are secure, the next step is ensuring the operating system recognizes and configures the drive. If the SSD shows up in the BIOS but not in File Explorer, you may need to initialize it, assign a drive letter, or format it properly.
Checking SSD Detection in Windows
To check if Windows detects your SSD, open Disk Management. You can do this by right-clicking the Start button and selecting Disk Management, or by searching for "Create and format hard disk partitions." This tool displays all connected drives, and their status will guide your next steps:
| Disk Status | What It Means | What to Do |
|---|---|---|
| Not Initialized | The drive is detected but lacks a partition table. | Right-click the disk and select "Initialize Disk" (choose GPT for modern systems). |
| Offline | The drive is disabled by the operating system. | Right-click the disk name and select "Online." |
| Unallocated | The drive is initialized but has no volume. | Right-click and choose "New Simple Volume." |
| Healthy (No Letter) | The partition exists but is hidden from File Explorer. | Right-click and select "Change Drive Letter and Paths." |
| Foreign | A dynamic disk moved from another computer. | Right-click and select "Import Foreign Disks." |
If the SSD doesn’t appear in Disk Management, double-check the BIOS settings and hardware connections.
Checking SSD Detection in macOS
On macOS, open Disk Utility by navigating through Finder > Applications > Utilities > Disk Utility. Look for your SSD in the sidebar. If it appears but isn’t mounted, click the Mount button. If the drive shows as unformatted or unreadable, use the Erase option to format it for macOS with APFS or for cross-platform use with exFAT.
For external SSDs that don’t show up, try plugging them into a different USB port, preferably one directly connected to the motherboard instead of a front panel port. Once the SSD is detected, you can proceed to assign a drive letter or format it as needed.
Setting Up Drive Letters and Formatting
Before using a new SSD for storage, you’ll need to complete three steps: initialization, partitioning, and formatting. These steps are sequential and essential.
In Disk Management, right-click a disk marked as "Unknown" or "Not Initialized", then select Initialize Disk. For modern systems, choose GPT (GUID Partition Table), which supports drives larger than 2TB and works with UEFI-based computers. Use MBR (Master Boot Record) only for older systems or drives under 2TB.
Once initialized, create a new volume by right-clicking on "Unallocated" space and selecting New Simple Volume. Assign a drive letter, such as D: or E:, and format the drive. Use NTFS for Windows systems or exFAT for compatibility across platforms. Opt for Quick Format to save time during the process.
If the SSD already has a partition but doesn’t appear in File Explorer, it might be missing a drive letter. In Disk Management, right-click the volume, select Change Drive Letter and Paths, and click Add or Change to assign an available letter.
Important Note: Initializing or formatting a drive will erase all data on it. If your SSD appears as "Not Initialized" or "RAW" but contains important files, consider using data recovery software before proceeding.
When Professional Repair Is Needed
Sometimes, even after trying all the basic troubleshooting steps, your SSD might still act up. This could mean there’s a deeper hardware problem that you can’t solve with a simple cable replacement or a BIOS tweak. Knowing when to stop trying to fix it yourself and seek expert help can be the key to saving your data.
Recognizing Hardware Failure
Certain signs can tell you when your SSD has a hardware issue rather than just a minor configuration problem. For example, if your drive doesn’t show up in the BIOS or appears with a generic label and 0 GB capacity, it’s often a sign of a failed controller or firmware. As Datarecovery.com explains:
"If your SSD is not detected by your computer’s BIOS, no data recovery software will be able to see it, scan it, or recover files from it."
Physical damage is another big clue. If you notice a burnt smell, visible damage to the circuit board, signs of moisture, or if the drive gets unusually hot, it’s likely an electrical failure. Unlike traditional hard drives that make clicking or grinding noises when they fail, SSDs tend to fail quietly. However, other symptoms might include a sudden slowdown in boot times (taking minutes instead of seconds) or repeated system crashes, especially when accessing large files. These could point to failing NAND flash cells or a drive struggling to locate critical system data.
One particularly concerning issue is when the drive switches to read-only mode. This happens when the SSD controller detects severe errors in the NAND or firmware and locks the drive to prevent further damage. Consumer-grade TLC NAND typically handles 1,000 to 3,000 program/erase cycles before wearing out. Once the drive nears this limit, the controller may activate protective measures.
Here’s a quick breakdown of common hardware failure signs and what they mean:
| Hardware Failure Sign | Description | What It Means |
|---|---|---|
| Controller Failure | The drive isn’t recognized by the system | May need firmware rebuilding or bypassing the controller |
| NAND Wear-out | Reached its Total Bytes Written (TBW) limit | May require direct imaging and reconstruction |
| Electronic Damage | Burnt components or shorted PCB | May need component repair or chip-off recovery |
| Bad Blocks | Increasing uncorrectable errors | May need hardware imaging to bypass bad sectors |
If you notice any of these issues, stop using the drive immediately. Repeatedly powering it on can worsen the damage, potentially locking the controller entirely. Avoid running utilities like chkdsk or First Aid on a failing SSD, as these can put extra stress on already unstable NAND cells. At this point, professional repair or recovery is your best option.
Professional Data Recovery and Repair Options
When DIY fixes fail, professional repair services step in with tools and techniques that go beyond what’s available to regular users. For instance, labs often use specialized systems like the PC-3000 SSD to interact directly with failed controllers and bypass standard interfaces. A survey found that 38% of users and professionals experienced SSD failures, with 64% of those cases resulting in total data loss. However, in some instances, recovery success rates can reach as high as 95–99%.
MDrepairs highlights:
"A truly ‘dead’ SSD – one that’s completely unresponsive – doesn’t mean your data is gone. It typically indicates a failure of the controller chip or the drive’s internal firmware."
In many cases, the data stored on the NAND flash memory remains intact even if the controller fails. Professionals can bypass the standard boot process to retrieve the data. For drives with completely destroyed controllers, experts may perform a chip-off recovery, which involves removing the NAND chips and reading the raw data with specialized tools. This process is highly technical, requiring cleanroom environments and advanced skills like microsoldering.
It’s worth noting that SSD recovery is generally more complex and expensive than recovering data from traditional hard drives. Advanced recovery methods can be costly – sometimes even more than the drive itself – so they’re usually reserved for cases where the data is extremely important.
Gadget Medics in Boca Raton is one example of a service provider that handles SSD failures. Their technicians specialize in delicate repairs like microsoldering broken connectors and diagnosing controller issues using lab-grade equipment. They offer evaluations and repairs with a warranty · Lifetime with Broken Club and competitive pricing. If your SSD is occasionally recognized, back up your files immediately before the problem worsens.
If recovery isn’t possible, the next step is to ensure the drive is disposed of securely.
Safe Disposal of Damaged SSDs
When an SSD is beyond repair or recovery, disposing of it properly is crucial to protect your sensitive data. Unlike traditional hard drives, SSDs require extra care because fragments of data can remain even after deletion. Many manufacturers offer secure erase tools that destroy data at the firmware level, ensuring it can’t be recovered.
For damaged drives, professional erasure services are the safest option. Simply formatting or initializing the drive won’t cut it – residual data can linger in unmapped NAND cells due to wear-leveling algorithms. If the drive is completely non-functional and can’t be erased, physical destruction of the NAND chips is the only way to ensure data security. Check with local electronics recycling programs to find options that include secure data destruction along with environmentally responsible disposal.
Conclusion
Dealing with SSD connection issues can feel overwhelming, but following a clear and systematic process can make troubleshooting much simpler. Start by checking the basics: ensure all physical connections are secure and confirm that the SSD is recognized in the BIOS. After that, focus on operating system settings like assigning drive letters or formatting.
"If the BIOS doesn’t see the SSD, the operating system never will." – Zeydulla Khudaverdiyev, PITS Data Recovery
Sometimes, the problem can be as simple as a loose M.2 drive or a slightly oxidized SATA cable, which can mimic more severe hardware issues. However, repeatedly powering on a failing drive can escalate the situation, potentially causing electronic damage or corrupting the firmware.
If these initial steps don’t work, it’s time to consider more serious repairs. Avoid attempting further fixes if the SSD isn’t detected in the BIOS on multiple systems, shows visible damage (like scorch marks), or switches to read-only mode. Continuing to use the drive in these conditions could result in permanent data loss. As Sam Goldheart from iFixit warns:
"If a hard drive shows even the slightest sign that it has problems, immediately copy the data from that drive to another hard drive or optical disc and replace that drive."
When basic troubleshooting fails to resolve the issue, professional help is often the safest option. Services like Gadget Medics in Boca Raton specialize in advanced recovery techniques for problems like controller failures or firmware corruption. With tools designed for precise repairs and a warranty · Lifetime with Broken Club, their technicians can assess whether your SSD needs a complex recovery process or a more straightforward fix.
Stick to these steps, and don’t hesitate to seek expert assistance if the problem persists.
FAQs
Will installing an M.2 SSD disable any SATA ports?
When you install an M.2 NVMe SSD, it might disable certain SATA ports on your motherboard. This happens because many motherboards share bandwidth between M.2 slots and SATA ports. Depending on which M.2 slot you use, some overlapping SATA ports may become inactive. To avoid any surprises, check your motherboard’s manual for detailed information about port compatibility.
How can I tell if my M.2 slot supports NVMe or only SATA?
When figuring out what kind of M.2 drive you need, start by checking your motherboard or laptop’s official specification sheet. This will tell you which protocols (like NVMe or SATA) and key types are compatible with the M.2 slots. You can usually find this information in the product manual or on the manufacturer’s website.
When should I stop troubleshooting and use Gadget Medics for data recovery?
If your SSD becomes undetectable even after performing basic checks, it may be showing signs of a critical failure. At this point, it’s best to stop troubleshooting on your own. Continuing could lead to further damage or even permanent data loss. Instead, consider turning to professionals like Gadget Medics, who specialize in safe data recovery and can help protect your valuable information.