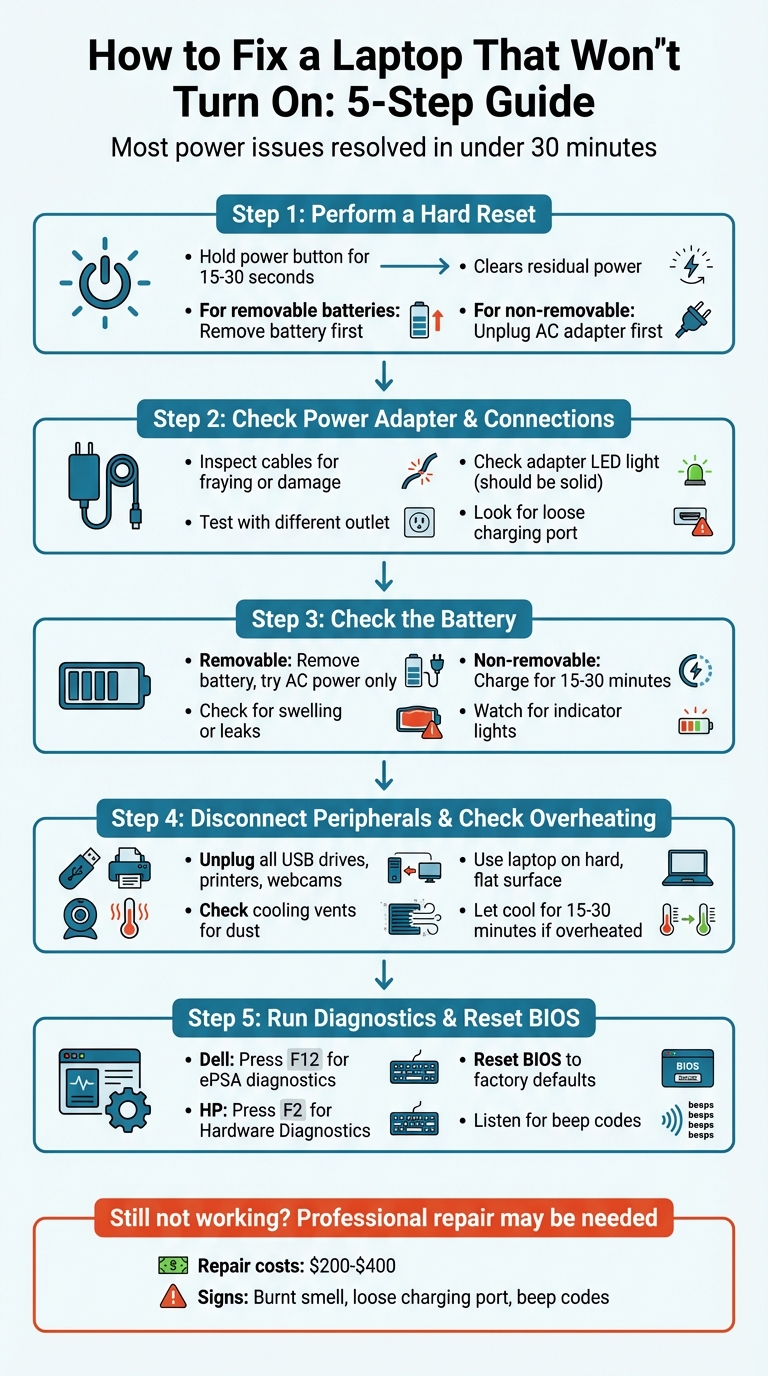
Struggling with a laptop that won’t power on? Here’s the good news: most power issues can be resolved in under 30 minutes with simple troubleshooting. Whether it’s a drained battery, a faulty adapter, or internal hardware, this guide breaks down the steps to identify and fix the problem.
Quick Steps to Try:
- Perform a Hard Reset: Clear residual power by holding the power button for 15-30 seconds.
- Inspect the Power Adapter: Check for damage, test with another outlet, or try a different adapter.
- Check the Battery: Remove or recharge the battery to rule out power delivery issues.
- Disconnect Peripherals: Unplug all external devices and check for overheating.
- Run Diagnostics: Use built-in tools to test hardware or reset the BIOS.
If these steps don’t work, it may indicate deeper hardware issues like a damaged motherboard or charging port. Professional repair might be necessary, especially if you notice physical damage or unusual sounds.
Keep reading for detailed instructions to troubleshoot and potentially save on repair costs.
5-Step Troubleshooting Guide for Laptops That Won’t Turn On
Step 1: Do a Hard Reset
When your laptop refuses to boot, performing a hard reset is a simple yet effective first step. This process clears out any lingering power in your laptop’s components that might be causing the problem. It’s quick, doesn’t require tools, and won’t delete your files.
According to experts from Dell and HP, hard resets can resolve temporary settings that block startup.
How to Perform a Hard Reset
Start by disconnecting all external devices like USB drives, printers, webcams, and SD cards. Then, follow these instructions based on your laptop’s battery type:
For laptops with removable batteries:
- Turn off the laptop and unplug the AC adapter.
- Remove the battery from its compartment.
- Press and hold the power button for 15 to 30 seconds to discharge any residual power.
- Plug in the AC adapter (leave the battery out for now) and press the power button.
If the laptop powers on, the battery might be the culprit.
For laptops with non-removable batteries:
- Unplug the AC adapter.
- Press and hold the power button for 15 to 30 seconds.
- Reconnect the AC adapter and try turning the laptop on.
Some Dell models require a specific RTC reset. In this case, hold the power button for 30 to 35 seconds until the power LED blinks three times.
If the Hard Reset Doesn’t Work
If your laptop remains unresponsive after a hard reset, the problem could lie with the power adapter, charging port, battery, or internal hardware. Signs like spinning fans, keyboard lights, or beep codes indicate the laptop is drawing power but may have trouble completing the startup process. This could point to a display or internal component issue.
If there’s still no response, move on to Step 2 to inspect your power adapter and connections.
sbb-itb-2e56335
Step 2: Check Your Power Adapter and Connections
If a hard reset doesn’t work, the next logical step is to inspect your power adapter and connections. A loose cable or a failing adapter is often the culprit when a laptop refuses to power on.
Inspect the Power Adapter and Cables
Carefully examine your power cable from end to end. Look for visible damage such as fraying, kinks, or exposed wires – these are clear signs that the adapter needs replacing. Also, check the adapter brick for any issues like discoloration, warping, or a burnt smell, which indicate failure.
Many power adapters include an LED light on the brick itself. This light should remain solid when plugged into a functioning outlet. If it’s off, the adapter might not be receiving power or could be defective. Similarly, check your laptop’s charging port LED. A white or green light usually signals a full charge, amber or orange means it’s charging, and no light – or a blinking one – could point to an issue with the adapter or battery.
Next, inspect the laptop’s charging port and the connector for any damage, bent pins, or debris. If the connection feels loose or wobbly, this may indicate physical damage to the port or connector. To further test, gently flex the cable near its ends – if the power cuts out, there may be an intermittent fault in the cable.
If possible, try using a different compatible power adapter to see if your laptop powers on. Be sure to use an adapter that matches your laptop’s voltage and amperage requirements, as incorrect or third-party adapters can fail to supply adequate power.
Once you’ve checked the adapter and cables, confirm that the power outlet you’re using is working properly.
Test the Power Outlet
To ensure the outlet is functioning, plug in a lamp or phone charger to see if it delivers power. Tim Fisher, SVP and General Manager of Lifewire, notes:
"Putting a real ‘load’ on the outlet, like a lamp, is a better option [than a multimeter]."
Avoid using power strips or surge protectors for this test – plug the adapter directly into the wall outlet. Sometimes, a faulty power strip can prevent electricity from reaching your laptop. If the outlet still doesn’t work, try another outlet in a different room to rule out a tripped circuit breaker.
Step 3: Check the Battery
If your power adapter and connections seem fine, the issue might lie with the battery itself. A malfunctioning battery can disrupt power delivery to your laptop, even when it’s plugged in.
For Removable Batteries
Start by shutting down your laptop, unplugging the AC adapter, and removing the battery. Once the battery is out, press and hold the power button for 30 to 60 seconds to discharge any remaining power . After that, reconnect the AC adapter without reinserting the battery and try powering on the laptop. If it turns on, the battery is likely at fault and may need to be replaced. As noted by Computer Hope:
"If the laptop works with the adapter plugged in, your battery is dead or defective".
Before replacing the battery, check it for any signs of damage such as swelling, leaks, or sticky residue. Also, inspect the battery compartment for debris or damage that might interfere with the connection. If the laptop still doesn’t power on, move on to checking internal components in the next steps.
For Non-Removable Batteries
If your laptop has a built-in battery, the process is slightly different. Begin by plugging in the laptop and letting it charge for 15 to 30 minutes before attempting to turn it on. A completely drained battery might need some time to gather enough charge to boot. Check the battery indicator lights near the charging port or on the keyboard – if they stay off or blink in an unusual pattern, the system might not be receiving power properly .
If the laptop remains unresponsive after charging, try a force restart. Unplug the AC adapter, hold down the power button for 30 seconds, then reconnect the adapter and attempt to power on the laptop again .
Step 4: Disconnect Peripherals and Check for Overheating
External devices or excessive heat can sometimes prevent your laptop from starting properly. Faulty peripherals might create electrical conflicts that disrupt the Power-On Self-Test (POST), while overheating triggers safety mechanisms that shut off power to protect your hardware.
Disconnect All External Devices
Start by unplugging all peripherals – USB drives, printers, webcams, external hard drives, and memory cards. Leaving a USB drive or memory card connected can confuse the BIOS, causing it to try booting from the wrong device. This often leads to errors like "Operating system not found" or a blank screen. Additionally, malfunctioning external devices can interfere with the laptop’s ability to power on.
If your laptop is docked, undock it and connect the AC adapter directly to the power port. Once everything is disconnected, press and hold the power button for 15–60 seconds to discharge any static electricity. With all peripherals removed, you can now check if overheating might be the issue.
Look for Overheating Problems
Overheating is another frequent cause of startup issues. As Ryan Dube from Lifewire points out:
"Laptops have special safety circuits to cut power to your laptop if any components overheat – usually the CPU".
Inspect the cooling vents on your laptop for dust, hair, or other debris that might be blocking airflow. Use compressed air to clear these obstructions, as vacuum cleaners or blowers can create static electricity that could harm internal components.
Always use your laptop on a hard, flat surface. Dell Technologies warns:
"Using the laptop on a cloth surface, a bed, a couch cushion, or your lap, can restrict or completely block the airflow. Prolonged restriction of airflow can cause overheating and potential damage".
If your laptop has shut down unexpectedly, allow it to cool for 15–30 minutes in a well-ventilated area before attempting to power it on again.
Step 5: Run Hardware Tests and Reset the BIOS
If your laptop still refuses to power on after addressing power connections, the battery, and peripherals, it’s time to dive deeper with built-in diagnostic tools. These tools can help pinpoint hardware issues, from faulty adapters to motherboard problems.
Use Built-In Hardware Tests
Many laptops come equipped with diagnostic utilities that can run preboot tests. Here’s how to access them on popular brands:
Dell laptops rely on a diagnostic tool called ePSA (Enhanced Pre-Boot System Assessment). To access it, start your laptop and repeatedly press F12 when the Dell logo appears. This opens the One Time Boot Menu – select "Diagnostics" to begin the test automatically. For a more detailed analysis, choose "Advanced Test" and enable "Thorough mode" to check specific components more intensively.
HP laptops use HP PC Hardware Diagnostics UEFI. Turn on the laptop and immediately tap F2 repeatedly until the diagnostics menu appears. From there, select "Component Tests" to examine specific hardware like the AC adapter or battery. An adapter test usually takes around 2–3 minutes, while battery tests may take 5–15 minutes. If a failure is detected, the tool generates a 24-digit failure ID code, which is essential if you need to contact HP support.
Hearing beeping sounds with a black screen? Pay attention to the beep pattern – it’s a diagnostic clue. For example:
- On HP laptops, one long beep followed by two short beeps often signals a video card issue, while one long and three short beeps may indicate a motherboard failure.
- For Dell laptops, you can isolate screen issues by holding the D key and pressing the power button to run an LCD Self-Test.
If these diagnostics don’t reveal or fix the issue, resetting the BIOS might help resolve conflicting configurations.
Reset the BIOS
Resetting the BIOS restores your laptop’s firmware to its original factory settings, which can resolve startup issues caused by misconfigured settings. Don’t worry – this process won’t delete your personal files.
For HP laptops with a black screen, try a BIOS recovery. Press and hold the Windows key + B, then press and hold the power button for one second. Continue holding both keys for 15 seconds. The screen might stay black for up to 40 seconds before the recovery interface appears, so patience is key.
For Dell laptops, press F2 repeatedly when the Dell logo appears to access the BIOS setup. Look for options like "Load Setup Defaults", "Restore Settings", or "Load Optimal Defaults." On older models, pressing F9 often restores default settings automatically.
A word of caution: Always connect your laptop to a stable power source during a BIOS reset. HP Support warns:
"It might damage the computer if this process is interrupted. Do not turn off or unplug the computer during the update process".
If your screen remains blank at startup, give it at least 5 minutes before forcing a shutdown – your laptop could be installing a critical update in the background.
When to Get Professional Repair Help
If your laptop remains unresponsive after trying a hard reset, checking power connections, testing the battery, and inspecting peripherals, it might be time to consider professional repair services. Persistent power issues often point to deeper hardware problems that require expert attention.
Signs You Need Expert Help
When basic troubleshooting doesn’t resolve the issue, your laptop may have significant hardware failures, such as problems with the motherboard, processor, or charging circuit. As Luigi Oppido, a Computer & Tech Specialist, explains:
"Sometimes, that charging circuit can go bad, and, unfortunately, that usually means you’ll need a new motherboard."
Here are some clear indicators that professional help is needed:
- Physical damage: Signs like a burnt smell, melted plastic, visible smoke, or liquid spills (sticky residue or moisture near the keyboard or ports) suggest serious internal damage. If you notice exposed wires, burn marks, or a charging cable that heats up excessively, disconnect power immediately to avoid potential fire risks.
- Charging port issues: A loose or wobbly charging port or broken pins inside the port often requires professional soldering or even a motherboard replacement. HP Support highlights:
"If the AC adapter connection to the computer is loose, the connector might be damaged and require repair."
- Display problems: If your laptop powers on (evidenced by lights or fan activity) but the screen remains black – even when connected to an external monitor – it could mean the LCD panel or display adapter needs replacing.
- Unusual sounds or error codes: Grinding noises, repetitive clicking, or specific beep codes can signal internal hardware failures, such as issues with the RAM, video card, or system board.
Here’s a quick reference table summarizing these issues:
| Sign of Issue | Likely Hardware Failure | What It Means |
|---|---|---|
| Burnt smell or melted plastic | Motherboard or power port | Likely a short circuit |
| Loose/wobbly charging port | Broken power pins or port | Needs professional repair or replacement |
| Power lights on, black screen | LCD panel or display adapter | Screen or internal video cable may need repair |
| Beep codes or blinking LEDs | RAM, video card, or motherboard | Refer to manufacturer codes; seek expert help |
| No power after hard reset | Motherboard or charging circuit | Requires professional diagnostics |
Before proceeding with repairs, check your warranty. Attempting DIY fixes could void it. If your laptop is out of warranty, power-related repairs typically cost between $200 and $400.
Why Choose Gadget Medics

When your laptop issues go beyond DIY solutions, Gadget Medics is here to help. They specialize in laptop repairs, offering free diagnostics, fast service, and a warranty · Lifetime with Broken Club on all repairs.
Before bringing your laptop in, back up any essential data to an external drive or cloud storage. Also, locate your device’s serial and model numbers (usually found on the bottom of the laptop) to ensure technicians can quickly source the right replacement parts.
Gadget Medics handles a wide range of repairs, from screen and battery replacements to complex motherboard fixes and water damage restoration. They also offer preventive maintenance services, such as internal cooling system cleaning and thermal paste replacement, to help avoid future overheating and performance issues.
Conclusion
Dealing with a laptop that won’t turn on can be incredibly frustrating, but most power-related problems can be resolved with a bit of troubleshooting. By carefully following the steps outlined in this guide – like performing a hard reset, checking your power connections, or running diagnostics – you can often pinpoint and fix the issue without spending any money.
However, if these steps don’t solve the problem, it may be time to consult a professional. Warning signs like burnt smells, visible physical damage, loose charging ports, or repeated hardware diagnostic failures often indicate more serious issues. In such cases, professional repair is the safest option. Keep in mind that out-of-warranty repairs can range from $200 to $400, and attempting advanced repairs on your own risks further damage or voiding any remaining warranty.
Gadget Medics provides free diagnostics and quick, dependable repair services, backed by a warranty · Lifetime with Broken Club on all their work. Before heading in, make sure to back up your data and have your laptop’s model and serial numbers handy for a faster repair process. From battery replacements to intricate motherboard repairs, their skilled technicians are ready to help.
FAQs
How can I tell if it’s the charger or the laptop?
To figure out whether the problem lies with the charger or the laptop, start by examining the power adapter and the charging port for any visible damage, such as bent pins or fraying wires. Make sure the charger is firmly connected and check for signs that the laptop is receiving power – look for indicator lights or listen for fan noise. If you have access to another compatible charger, try using it with your laptop. Alternatively, test your charger on a different device. If the charger functions properly elsewhere, it’s likely an issue with the laptop itself.
What does it mean if the fan runs but the screen stays black?
If your laptop’s fan is running but the screen stays black, it might indicate a problem with the display connection, a faulty display cable, or other hardware issues impacting the screen. While the device powers on, these problems could prevent any image from appearing. Start by inspecting for loose connections, and if that doesn’t resolve the issue, you may need to consult a professional technician.
When should I stop troubleshooting and get a repair?
If you’ve already tried the basics – like checking the power source, resetting the device, or testing the hardware – and the issue still isn’t resolved, it might be time to call in a professional. This is especially important if you notice signs of hardware failure or internal damage. Attempting to fix complex problems without the right expertise can sometimes make things worse. When in doubt, it’s safer to reach out to a professional repair service to avoid further complications.