When your device starts acting up, it could be a hardware issue. Regular checks can prevent costly repairs and data loss. Here’s how to identify problems early:
- Start with safety: Power down, unplug, and back up your data before inspecting. Ground yourself to avoid static damage.
- Visual checks: Look for cracks, bulging batteries, dust in vents, or damaged ports. Strange noises or overheating are warning signs.
- Internal inspection: Carefully clean dust, check for burnt components, and ensure cables are secure. Use isopropyl alcohol for cleaning.
- Diagnostic tools: Use built-in tools like Windows Memory Diagnostic or Apple Diagnostics to test components like RAM, CPU, or battery health.
- Know your limits: For severe issues like liquid damage, swollen batteries, or motherboard failures, seek professional help.
Routine inspections can save you time and money, but knowing when to involve an expert is key.
How to Prepare for a Safe Hardware Inspection
Essential Tools for Safe Hardware Inspection by Category
Before diving into your device’s hardware, taking the proper safety steps is essential. Skipping these precautions could result in electric shock, data loss, or irreversible damage to delicate components. A little preparation goes a long way in ensuring your inspection is both safe and successful. Follow these steps to protect yourself and your equipment.
Power Down Your Device and Back Up Your Data
Start by unplugging your device from any power source. Even when turned off, some components can still carry a charge. If your device has a removable battery, take it out to minimize the risk of electrical shorts or accidental shocks.
Backing up your data is another must. Save important files to an external drive or a cloud service. This way, if a component fails or something disconnects during the inspection, your data remains secure. Keep in mind that capacitors can retain charge even after unplugging, so handle components carefully. To stay safe, work with one hand behind your back, remove any jewelry, secure your hair, and wear non-conductive clothing.
Static electricity is a silent threat to internal components like the RAM or CPU. To prevent damage, ground yourself by touching the metal chassis of the device before handling its internals. Choose a clean, dry, and well-lit workspace. If the air is especially dry, consider using a mister to add a bit of humidity, which can help reduce static buildup.
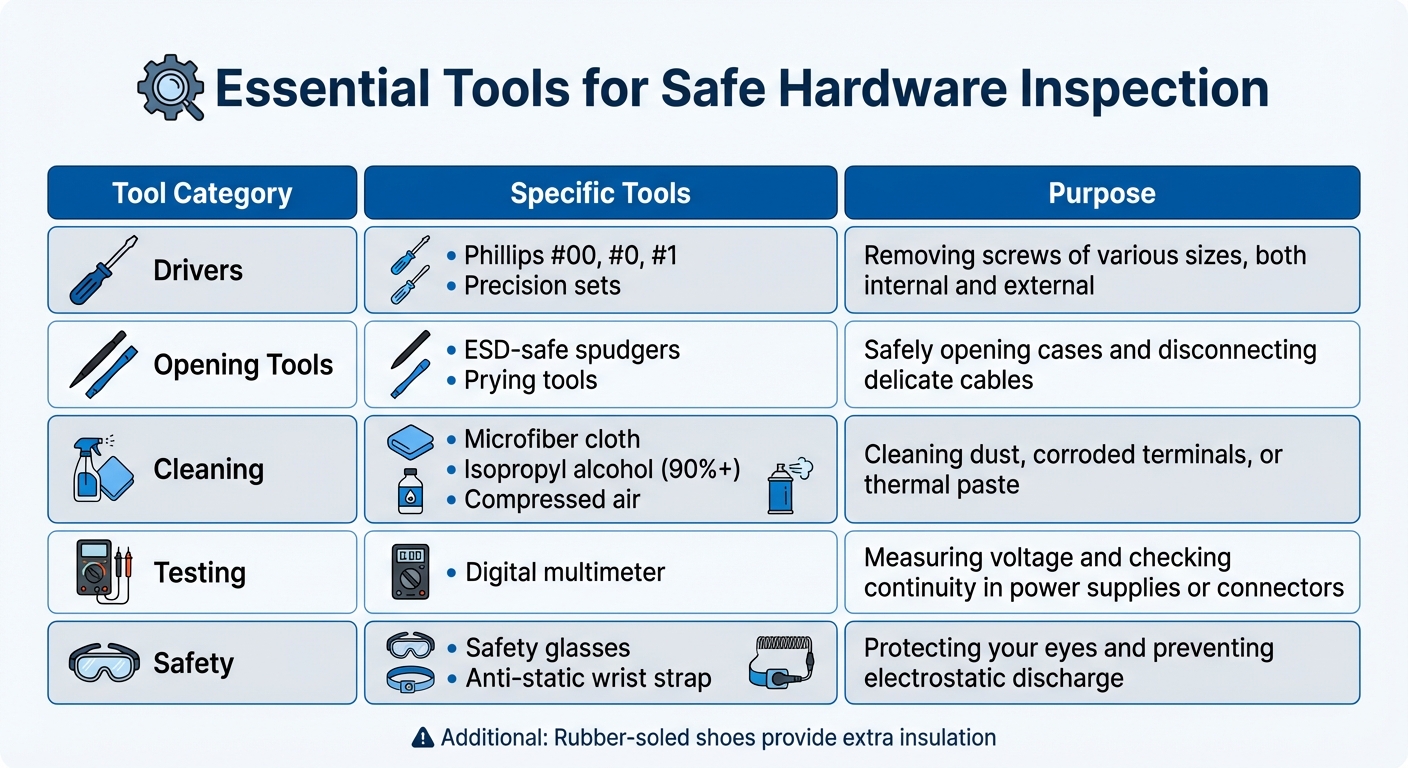
Tools You’ll Need for Hardware Inspections
You don’t need a high-end toolkit, but having the right tools can make the process safer and more efficient. Here’s a quick guide to essential equipment:
| Tool Category | Specific Tools | Purpose |
|---|---|---|
| Drivers | Phillips #00, #0, #1; precision sets | Removing screws of various sizes, both internal and external |
| Opening Tools | ESD-safe spudgers, prying tools | Safely opening cases and disconnecting delicate cables |
| Cleaning | Microfiber cloth, isopropyl alcohol (90%+), compressed air | Cleaning dust, corroded terminals, or thermal paste |
| Testing | Digital multimeter | Measuring voltage and checking continuity in power supplies or connectors |
| Safety | Safety glasses, anti-static wrist strap | Protecting your eyes and preventing electrostatic discharge |
Additionally, wearing safety glasses can shield your eyes from sparks or debris, and rubber-soled shoes provide extra insulation.
How Often to Inspect Your Devices
How often you inspect your hardware depends on how you use it and the environment it’s in. For most home users with standard laptops or desktops, a monthly visual check is usually enough to catch potential issues early.
If you’re a heavy user – whether it’s a gaming rig, workstation, or a device in a dusty or high-use setting – more frequent checks might be necessary. A quick "look-listen-feel" routine before each use can help you spot frayed cables, strange noises, or signs of overheating.
These regular inspections are all about catching problems before they escalate. If your checks consistently show no issues, you can gradually extend the time between inspections. However, if problems are cropping up often, shortening the interval is a smart move to avoid costly failures.
sbb-itb-2e56335
How to Perform Visual and Physical Hardware Checks
Taking the time to inspect your device can help you catch potential issues before they escalate. A detailed visual and physical check can uncover problems that might lead to complete failure if left unaddressed. Start by examining the exterior, then move on to the internal components.
Inspecting External Damage
Begin by checking the display for any visible damage like cracks, discoloration, shattered glass, or water marks. If the screen stays black but the device powers on, shine a bright light directly onto it – if you can faintly see images or text, the backlight may have failed.
Next, inspect the battery and casing. Look for signs of bubbling, bulging, melting, or discoloration, as these indicate potential fire or chemical hazards. If you notice heat, smoke, steam, or bulging, avoid handling the device immediately.
Examine all ports and connectors closely. Check charging ports (USB-C, Lightning) and A/V ports (like HDMI or VGA) for bent pins, debris, or corrosion. Carefully remove any debris to maintain a solid connection. Additionally, inspect power bricks and cables for fraying, loose connections, or damaged pins.
Don’t forget to check audio and input components. Look for blocked or damaged speaker and microphone grilles, missing or unresponsive keyboard keys, and worn or cracked touchpad surfaces. Listen for unusual clicking or grinding noises from mechanical hard drives, and check cooling vents for dust buildup or obstructions.
If the device won’t power on, try removing the battery (if possible) and holding the power button for 10–15 seconds to discharge any residual electricity. For desktops, check the motherboard status light for clues.
Once you’ve completed the exterior inspection, move on to the internal components to look for dust or damage.
Checking Internal Components for Dust and Damage
After inspecting the outside, carefully open your device to examine the internal components. Follow the manufacturer’s instructions to locate hidden screws and avoid damaging the device. Many modern devices have RAM and CPUs soldered directly to the motherboard – don’t attempt to remove these as it could cause irreversible damage.
Inside, use a small, soft brush to gently clean dust and debris from circuit boards without disturbing delicate components. Look for signs of burnt components, loose cables, or dried liquid residue. Liquids with a low pH, like lemon juice (pH 2.3) or cola (pH 2.5–3.5), are particularly harmful as they speed up corrosion compared to pure water (pH 7.0).
"In any situation involving the submersion or splashing of an electronic device in any liquid, the first step is to disconnect any power source as soon as this is safely possible." – iFixit
Always disconnect the power source immediately if the device is exposed to liquid.
Pay attention to ribbon cables – use the colored stripe to identify "Pin 1" and ensure proper reconnection. Most modern cables are designed to fit only one way. If you remove a heatsink to inspect the CPU, remember to apply fresh thermal paste before reassembling the device to ensure proper cooling. For cleaning electronic components, use isopropyl alcohol with a concentration of 90% or higher, as it evaporates quickly and removes moisture effectively.
If you notice smoke, steam, or melting on a circuit board, stop immediately and seek professional assistance. These are clear indicators of severe damage.
Device Inspection Comparison Table
| Device Type | Signs of Physical Damage | DIY Checks | When to Call a Professional |
|---|---|---|---|
| Smartphones | Cracked screen, bulging back panel, blocked mic/speaker grilles | Clean grilles with a soft brush; use a screen protector for minor cracks | Battery is bulging; screen is unresponsive; liquid submersion |
| Laptops | Loose hinges, frayed power cord, stuck keys, cracked LCD | Replace detachable power cables; use compressed air on keys | Hinges are broken; screen is shattered; internal smoke/heat |
| Desktops | Dents in casing, motherboard status light is off, loud HDD clicking | Reseat RAM modules; replace external power cables; clean dust filters | Power supply failure; motherboard doesn’t POST after troubleshooting |
| Consoles | Blocked cooling vents, damaged HDMI ports, grinding disc drive | Vacuum vents; check HDMI cable with another monitor | Port pins are bent/broken; device overheats and shuts down |
| Drones | Cracked shell/frame, chipped propellers, obstructed sensors | Replace propellers; clean sensor lenses with microfiber cloth | Frame integrity is compromised; motor failure; sensor calibration errors |
How to Use Built-In Diagnostic and Monitoring Tools
Once you’ve completed your visual inspection, built-in diagnostic tools can uncover hardware issues that aren’t immediately obvious. These tools can detect problems like failing memory, overheating components, or a battery that’s losing its capacity. Most operating systems come equipped with diagnostic utilities that are easy to use.
How to Access Diagnostic Tools on Different Platforms
Windows has several built-in utilities for hardware diagnostics. To start, open Command Prompt and type perfmon /report to generate a detailed health report covering your CPU, disk, and network performance. If you’re specifically looking to check for memory problems, search for "Windows Memory Diagnostic" in the Start menu and run it to scan your RAM. Before diving into diagnostics, make sure to back up any critical data and connect your device to a power source.
macOS users can rely on Apple Diagnostics to pinpoint hardware issues. For Macs with Apple silicon, press and hold the power button during startup until the "Options" screen appears, then press Command (⌘)-D. On Intel-based Macs, turn on the device and press and hold the D key immediately. Before running diagnostics, disconnect any unnecessary external devices and ensure the system has proper airflow.
"If you think your Mac might have a hardware issue, you can use Apple Diagnostics to help determine which hardware component might be at fault." – Apple Support
Dell and HP computers also offer their own diagnostic tools. Dell users can press F12 during startup to access the "One Time Boot Menu" and run the ePSA diagnostic tool. HP devices feature a UEFI Hardware Diagnostic tool, which operates outside the operating system to isolate hardware failures from software-related problems. Both tools can test critical components like the CPU, hard drive, fans, and battery without booting into Windows.
Once the diagnostics are complete, it’s important to understand how to interpret the results.
How to Read Diagnostic Results and Warnings
Interpreting diagnostic results is key to deciding whether you can handle the repair yourself or need professional assistance.
For Windows, diagnostic reports include "Resource utilization trends" and "Event log entries." Look for recurring warnings or failures that point to specific hardware issues. If memory errors show up, identify the faulty RAM module so it can be replaced.
On macOS, Apple Diagnostics provides reference codes after each test. Write these down immediately, as they specify the exact component causing the issue. Starting with macOS Tahoe 26, diagnostics can target specific components like the display, keyboard, or trackpad instead of running a full system scan.
For Dell and HP devices, error codes, validation codes, or 24-digit failure IDs will appear after testing . These codes are essential when contacting support or arranging for repairs. HP’s diagnostic tool generates a unique 24-digit failure ID that can be entered directly into their repair portal. These codes help determine whether the issue can be fixed on your own or requires professional attention.
Diagnostic Tools Reference Table
| Platform | Tool Name | What It Tests | Action If It Fails |
|---|---|---|---|
| Windows | Windows Memory Diagnostic | RAM/Memory stability | Identify and replace faulty memory modules |
| Windows | Performance Monitor (perfmon) |
CPU, Disk, and Network health | Analyze reports to identify performance issues |
| macOS | Apple Diagnostics | Logic board, sensors, and input devices | Share reference code with Apple service |
| Dell PC | SupportAssist/ePSA | CPU, Hard Drive, Fans, and Battery | Provide error code to Dell support |
| HP PC | HP PC Hardware Diagnostics UEFI | Comprehensive hardware isolation | Enter 24-digit failure ID into HP’s repair portal |
How to Check Key Hardware Components for Problems
After running your initial diagnostics, it’s time to examine key hardware components to pinpoint the issues flagged by your software. Problems with power supplies, batteries, and cooling systems are common culprits behind device malfunctions. Catching the warning signs early can save you from further damage or risky DIY fixes.
Checking Power Supply and Charging Hardware
Power supply problems can show up in a variety of ways: your device might not power on, shut down unexpectedly, fail to boot, or struggle during demanding tasks. You might even notice flickering lights or encounter the dreaded Blue Screen of Death. Pay attention to physical signs, too. If you smell something burning or notice a faint electrical odor, stop using the device immediately. Strange noises like buzzing, whining, or clicking from the power supply are also red flags. Inspect power cables for secure connections and check for bloated or leaking capacitors, scorched parts, or bent connector pins.
"Early identification of the power supply failure symptoms… helps to prevent equipment damage and maintain system stability, but it also has the added benefits of cost savings and reducing the risk of workplace hazards." – Justin Madsen, Author, Bravo Electro
For advanced troubleshooting, you can monitor voltage fluctuations using diagnostic tools or a multimeter. However, if you notice smoke, burning smells, or experience electric shocks, stop immediately. Repairing internal power supplies can be dangerous since large capacitors can hold a charge even when the device is unplugged.
Once you’ve checked the power supply, move on to the battery and charging ports for a complete power system check.
Checking Battery Health and Charging Ports
Battery problems often show up as rapid draining, sudden shutdowns despite a high charge, or sluggish performance caused by CPU throttling. If you’re using an iPhone with iOS 11.3 or later, you can go to Settings > Battery > Battery Health & Charging to check the battery’s maximum capacity. Apple generally suggests replacing the battery when its capacity falls below 80%.
Physical signs of battery trouble shouldn’t be ignored. A swollen battery can push the screen away from the device’s body, create a hazy white display, or feel soft to the touch. If you notice swelling, stop using the device right away. Avoid puncturing the battery and let it fully discharge before attempting removal or disposal.
For charging port issues, test your device with a known working cable and adapter. If the problem persists, inspect the port for lint or debris. Use compressed air to clean it after powering down the device. If your device only charges intermittently or not at all, the issue could stem from a damaged port, faulty cable, or a problem with the battery connector.
Once you’ve ruled out power and battery issues, shift your focus to the cooling system to ensure your device isn’t overheating.
Checking Cooling Systems and Overheating Issues
Overheating often reveals itself through loud, constantly running fans, sudden performance dips, or unexpected shutdowns during heavy tasks. You might also encounter error messages like "Air Temperature Sensor Not Detected" or feel excessive heat near the exhaust vents.
To address this, clean air vents and fans using compressed air to clear out dust and debris. Avoid using vacuum cleaners or blowers, as they can create static electricity that might harm your device. Always use laptops on hard, flat surfaces to maintain proper airflow – soft surfaces like beds or couches can block vents and cause overheating. Similarly, ensure desktops have several inches of clearance from walls for better ventilation.
Keeping your BIOS and drivers up to date is crucial, as they manage fan speeds and thermal performance. Reducing system load by closing unnecessary apps or lowering graphics settings during resource-heavy tasks can also help manage heat. Most devices come with built-in diagnostics (like Dell’s F12 boot menu) that can help identify fan or sensor issues. If overheating persists despite these steps, it’s best to consult a professional repair service.
When to Contact Professional Repair Services
Warning Signs That Require Professional Help
Some hardware issues are too risky to handle on your own and demand professional attention. For instance, liquid damage, battery swelling, clicking hard drives, and electrical shorts are red flags that shouldn’t be ignored. If your device comes into contact with liquid, power it down immediately and have it professionally cleaned. Experts use ultrasonic cleaners to reach areas that a simple toothbrush can’t touch. And forget the old "put it in rice" trick – it doesn’t remove contaminants and can actually lead to more damage over time.
Battery problems like swelling, leaks, or discoloration are another serious issue that requires immediate action. Ignoring these signs can lead to safety hazards. Similarly, if your hard drive starts making clicking or grinding noises, it’s likely experiencing mechanical failure, which calls for expert diagnostics.
Modern devices are also packed with high-voltage components and soldered parts that require specialized tools for repairs. Attempting DIY fixes on these can result in severe damage or even render your device unusable. For instance, CPUs and RAM in many newer devices are soldered directly to the motherboard. Trying to desolder them without the right equipment is a recipe for disaster. Additionally, persistent issues like startup beep codes or recurring Blue Screens of Death often point to deeper problems with the motherboard or other components – problems that only trained professionals can effectively diagnose and repair.
Getting professional help promptly not only resolves these immediate concerns but also helps protect your device’s performance in the long run. Spotting these warning signs early allows for timely intervention.
Why Choose Professional Diagnostics and Repairs
When these issues arise, turning to professional repair services is your best bet. Experts bring advanced diagnostic tools and the ability to perform precise, component-level repairs – far beyond the scope of DIY fixes. Take Gadget Medics in Boca Raton, for example. They handle repairs for a wide range of devices, from smartphones and tablets to laptops, desktops, gaming consoles, and even drones – all in one place. Their process prioritizes saving your data before addressing hardware issues, so your important files stay protected.
The financial benefits are hard to ignore. Professional repairs can save you 60% to 80% compared to buying a brand-new device. While manufacturers often push for full unit replacements even for minor defects, repair shops like Gadget Medics focus on fixing the specific problem. They even offer same-day service for many smartphone models and back their work with a warranty · Lifetime with Broken Club.
"Gadget Medics has emerged as Boca Raton’s technological emergency room – a one-stop repair destination where damaged devices get second chances without the manufacturer price tags or inconvenient waiting periods." – Gadget Medics
Beyond saving money, professional repairs contribute to reducing electronic waste, keeping broken devices out of landfills. These services also provide thorough assessments, identifying both current issues and potential future risks. This gives you the chance to address problems before they escalate. When dealing with high-voltage components, soldered parts, or persistent system errors, professional expertise isn’t just a smart choice – it’s essential for ensuring safe and reliable repairs.
Conclusion
Regular hardware inspections are one of the simplest yet most effective ways to avoid expensive repairs and potential data loss. As Andrew Cunningham, Senior Technology Reporter at Ars Technica, aptly states:
"Detecting a failure early is the best way to prevent data loss."
By routinely checking your devices, you can catch warning signs like overheating, strange noises, or battery swelling before they turn into bigger problems. This kind of preventative care doesn’t just safeguard your data – it also helps ensure that one faulty component doesn’t end up damaging your entire system.
For many common issues, DIY troubleshooting can be a lifesaver. Built-in diagnostics, swapping out cables, or reseating RAM often resolve problems, especially since most computer errors are rooted in software rather than hardware. Still, knowing when to step back is crucial. Mike Rodriguez, a Computer Technician, offers a valuable reminder:
"The elements of time, frustration, money, and security will always add up to be more than what procrastination is worth."
If the problem is beyond your skillset, it’s time to consider professional help. As discussed earlier, expert repair services are indispensable for tackling complex issues. For example, Gadget Medics in Boca Raton provides thorough repair solutions, complete with the expertise and warranty coverage to give you peace of mind. Sharing your diagnostic findings with technicians can also speed up the repair process.
FAQs
What are the common signs of hardware problems in a device?
Some telltale signs of hardware problems include:
- Device won’t power on: No lights, sounds, or screen activity when you try to start it up.
- Excessive heat: The device feels abnormally hot, fans are unusually loud, or it shuts down without warning.
- Sluggish performance: The system is slow, laggy, or becomes unresponsive.
- Frequent crashes or freezes: Random shutdowns or lock-ups occur with no clear pattern.
- Strange noises or error messages: Clicking, grinding, or other odd sounds, along with hardware-related error alerts.
Spotting these issues early can save you from bigger problems later. If you experience any of these, consider checking the device or consulting a professional.
How can I clean my device’s internal components safely?
To clean your device’s internal components safely, start by turning it off completely and unplugging all cables. If the design allows, remove the battery as well. To protect sensitive parts from static damage, discharge any static electricity by touching a grounded metal object. Then, carefully open the device using the proper tools, and keep screws organized to make reassembly easier.
Use compressed air in short bursts to blow dust away from fans, heat sinks, and circuit boards, holding the nozzle a few inches away to avoid damage. For more stubborn dust or debris, gently brush it off with a soft, anti-static brush. To clean ports and connectors, lightly dampen a cotton swab with isopropyl alcohol (70% or higher) and wipe gently. Be sure to let everything dry completely before putting the device back together.
If you’re not confident or don’t have the right tools, consider professional help. Gadget Medics in Boca Raton offers cleaning and repair services, complete with a warranty · Lifetime with Broken Club on repairs. Regular cleaning like this can keep your device running smoothly and help prevent hardware problems.
When should I contact a professional for hardware issues?
If you spot physical damage on your device, run into frequent issues even after trying simple fixes, or feel uneasy about handling or testing hardware yourself, it’s time to seek help from a professional. It’s also a good idea to consult an expert if diagnostic tools point to a hardware issue or if the problem continues despite trying software solutions.
For dependable repair services, check out Gadget Medics. Their experienced technicians can handle a variety of hardware issues efficiently and with care.